3/9/11

Hand Art

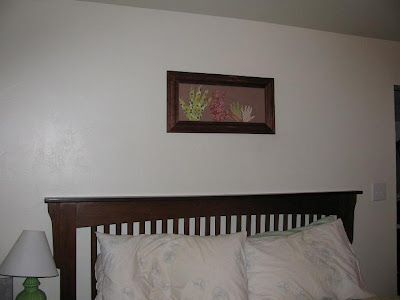
Since we moved, 9 months ago, I have had a bare wall above my bed. It has plagued me and I came up with several idea but nothing seemed right. Until I thought of this.


This is our framed hand art. Each hand is the traced hand of a member of our family. They overlap and my wedding band (which I don't think you get a great shot of) is actually made of paper from my husband's hand. Cute, eh?

All we did was find a nice frame we liked. This frame had a mat for 4 4x6 pictures and the dimensions of the frame were 8x20 in. If our family grows to be larger than 5 people someday, we'll need a larger frame. I think it's becuase my husband's hand is HUGE.

We took 2 pieces of double sided 12x12 patterned scrapbook paper. Then we traced 1 hand on each side and cut. Pretty simple. I used butcher block style paper for the background, cut to size, and glued the hands on, slightly overlapping. It would be smart to keep the mat to be able to trace the background the first time and any time you may want to re-make it. Just sandwich it all in the frame.

The whole time I was arranging the hands my 2 year old kept saying, "Too-ged-uh for-eber, wite Mommy?" (Together forever, right Mommy) And I said yes, of course!

You could also do this with a super cute wrapping paper as the background and then use either a coordinating pattern for the hands or - probably better - solid colors for the hands. Each member of the family could even decorate their own hand. Some sort of writing might be cute, like the family name and year or maybe "Together Forever" - inspired by a 2 year old.

Then you just have to hang it somewhere it will stand out, because it's super cute!

And don't forget to let your kiddos jump on your bed while you hang it because, probably, if your bed is like mine, they don't get to play in it often. It'll be extra special for Toogeduh foreber.

3/3/11

Birthday Banners

Back in July 2010 I started a post on birthday banners. My little girly turned 2 and I wanted to share the banner I made for her. Since then I have made two more but only have pictures of 1 more. My husband's birthday if Christmas Eve so while he got a banner, I didn't take pictures, sadly.

I'm going to give an in depth tutorial but here are the supplies you need:


And here is how Gwenna's turned out.


Her center banner:


For Meredith's banner, 4 months later, I used the same pom-pom string and just changed everything else out. Simple enough.


Her flags and center piece:


Here is the digital copy of the center piece I created for Mer's banner with elements from Summer Driggs.
It's so super simple and really makes the birthday boy or girl feel so special. Give it a try the next time a loved one's birthday rolls around!

Paper Crafts for every Holiday

This post is frustrating me.

Every once in a while I have a picture issue with blogger.

When I upload a picture, it's oriented correctly. Then, it uploads sideways, rotated some amount - either 90 or 180 degrees. SO annoying. Even if I delete it, it won't upload right. Some files and blogger are NOT friends.

But I'm going to move on.

I wanted to share a small decoration we do for each holiday.

Gwenna LOVES "projects" and for her that's anything from coloring to stamps to paper craft and beyond. She just loves hands on crafty projects. I don't know WHERE she gets it! So I figured out a way to let Gwenna help decorate for every holiday. This is good because I only really decorate for Christmas and birthdays so now our house has something up year round.

All I do if pick a shape for Gwenna to decorate. She LOVES glitter glue/paint so I let her do that becuase I also love sparkles. So Gwenna decorates a shape and we mount it on pretty paper with some holiday saying. Then we trim and frame. See? SO simple and really cute. You can, of course, tell Gwenna did it. I love that! She's always so proud of the finished product when she makes projects.

I have two example to share. The first TERRIBLE picture you will just have to cock your hear to the right to take in properly.

Of course there are little hands involved.

Here is our Valentines Decoration I took out of the frame as we rotated a new one in
.
And here is our St. Patrick's Day Decoration. It was a lot of fun to make. I did the bottom right leaf of the clover and most of the stem. Gwenna did the rest.


Pop it in a frame and you're good to go, glare and all! :)


Make sure the previous holiday's Decoration gets put behind the current so you can rotate properly.

Easter is coming next and I'm really looking forward to that one. I figure, some Christmas or even Thanksgiving, Meredith will get a turn!